Transcoding Videos
To use FlipFlop Cloud, you must first sign up as a user. However, currently, registration is only available through inquiry due to policy restrictions. For more information on how to register and subsequent usage procedures, please refer to User Registration and Usage Procedures.
Introduction
You can store videos on FlipFlop Cloud by compressing them through transcoding. Furthermore, by uploading videos and managing the transcoded results in the form of posts, if your service provides video content as posts, you can integrate FlipFlop Cloud to retrieve and use transcoded videos in that format. If you only need the transcoded video output, you can store the videos according to a specific rule and retrieve them as needed to use their information.
This document provides guidance on how to transcode videos on FlipFlop Cloud and the procedures for integration.
Preliminary Information
FlipFlop Cloud operates separate environments for testing and commercial use, depending on the purpose. Information about each environment is as follows:
This document is focused on providing explanations for testing purposes, and all information is based on the sandbox environment.
Prerequisites
Creating a FlipFlop App
All functions in FlipFlop Cloud are executed within the unit of an app. The feature for live broadcasting with RTMP streams is currently only supported in the FlipFlop App. It is not yet available in the Vicollo App, but support is planned soon.
For details about app types and differences, refer to the Key Concepts > FlipFlop Cloud App Types documentation.
If you have requested the use of the live broadcast feature during the account issuance process, information about the FlipFlop App created with your account may also be provided. After logging into the User Console, you can view the list of your apps. Apps starting with vicollo_ are Vicollo Apps, while others are FlipFlop Apps. If a FlipFlop App already exists and you have its API key/secret information, you can proceed to the next step. If you have lost or do not know the API key/secret for an existing FlipFlop App, please contact support@jocoos.com. If no FlipFlop App exists, you will need to create one.
To create an app, click the Create button in the top right corner of the app list screen in the User Console. All apps created in the current User Console are FlipFlop Apps. Simply fill in the required information in the popup and click Create App.
When the app is created, a popup will display the API key/secret information. This information is required when calling the FlipFlop App server API. Since the API secret cannot be viewed again after closing the popup, it must be securely recorded and stored to prevent exposure. After recording the API key/secret information, click the Complete button to close the popup.
Overview
If you have completed the prerequisite steps of user registration and creating a FlipFlop App, you can now proceed with the necessary steps for live broadcasting. The overall process consists of the following stages:
- Creating/Registering Members
- Creating a Video Post
- Configuring Video Post Details (e.g., transcoding specifications)
- Uploading the Original Video File and Monitoring Transcoding Progress/Results
The following sections provide a detailed explanation of each step, along with specific broadcasting settings and features. This guide is divided into two parts:
First, it explains how to perform video transcoding using the User Console.
Then, it details how to integrate the FlipFlop App's video transcoding functionality into other services using the FlipFlop App Server API.
Transcoding Videos from User Console
First, access the User Console through a web browser and log in using the issued account credentials.
1. Creating/Registering Members
All functions within a FlipFlop App are member-centric. Therefore, live broadcasting must also be conducted by members, and you need to create members in the FlipFlop App. Members can be created by selecting an app in the User Console, navigating to the App Users screen, and clicking the Create button at the top right. Fill in the required member information in the popup to create a member.
The most essential attribute for creating a member is the appUserId, which serves as a unique identifier for the member. The appUserId must be unique according to certain rules. If you want to integrate the FlipFlop App into another service to provide live broadcasting to users, it is recommended to use the unique identifier of the other service’s users as the appUserId.
2. Creating a Video Post
To perform video transcoding, you must first create a Video Post, which serves as the storage unit for the transcoding task and its results.
In the User Console, select your App and navigate to the VideoPosts screen to view the list of existing Video Posts. To create a new one, click the Create button in the upper-right corner. A pop-up window will appear where you can enter the necessary details for the Video Post.
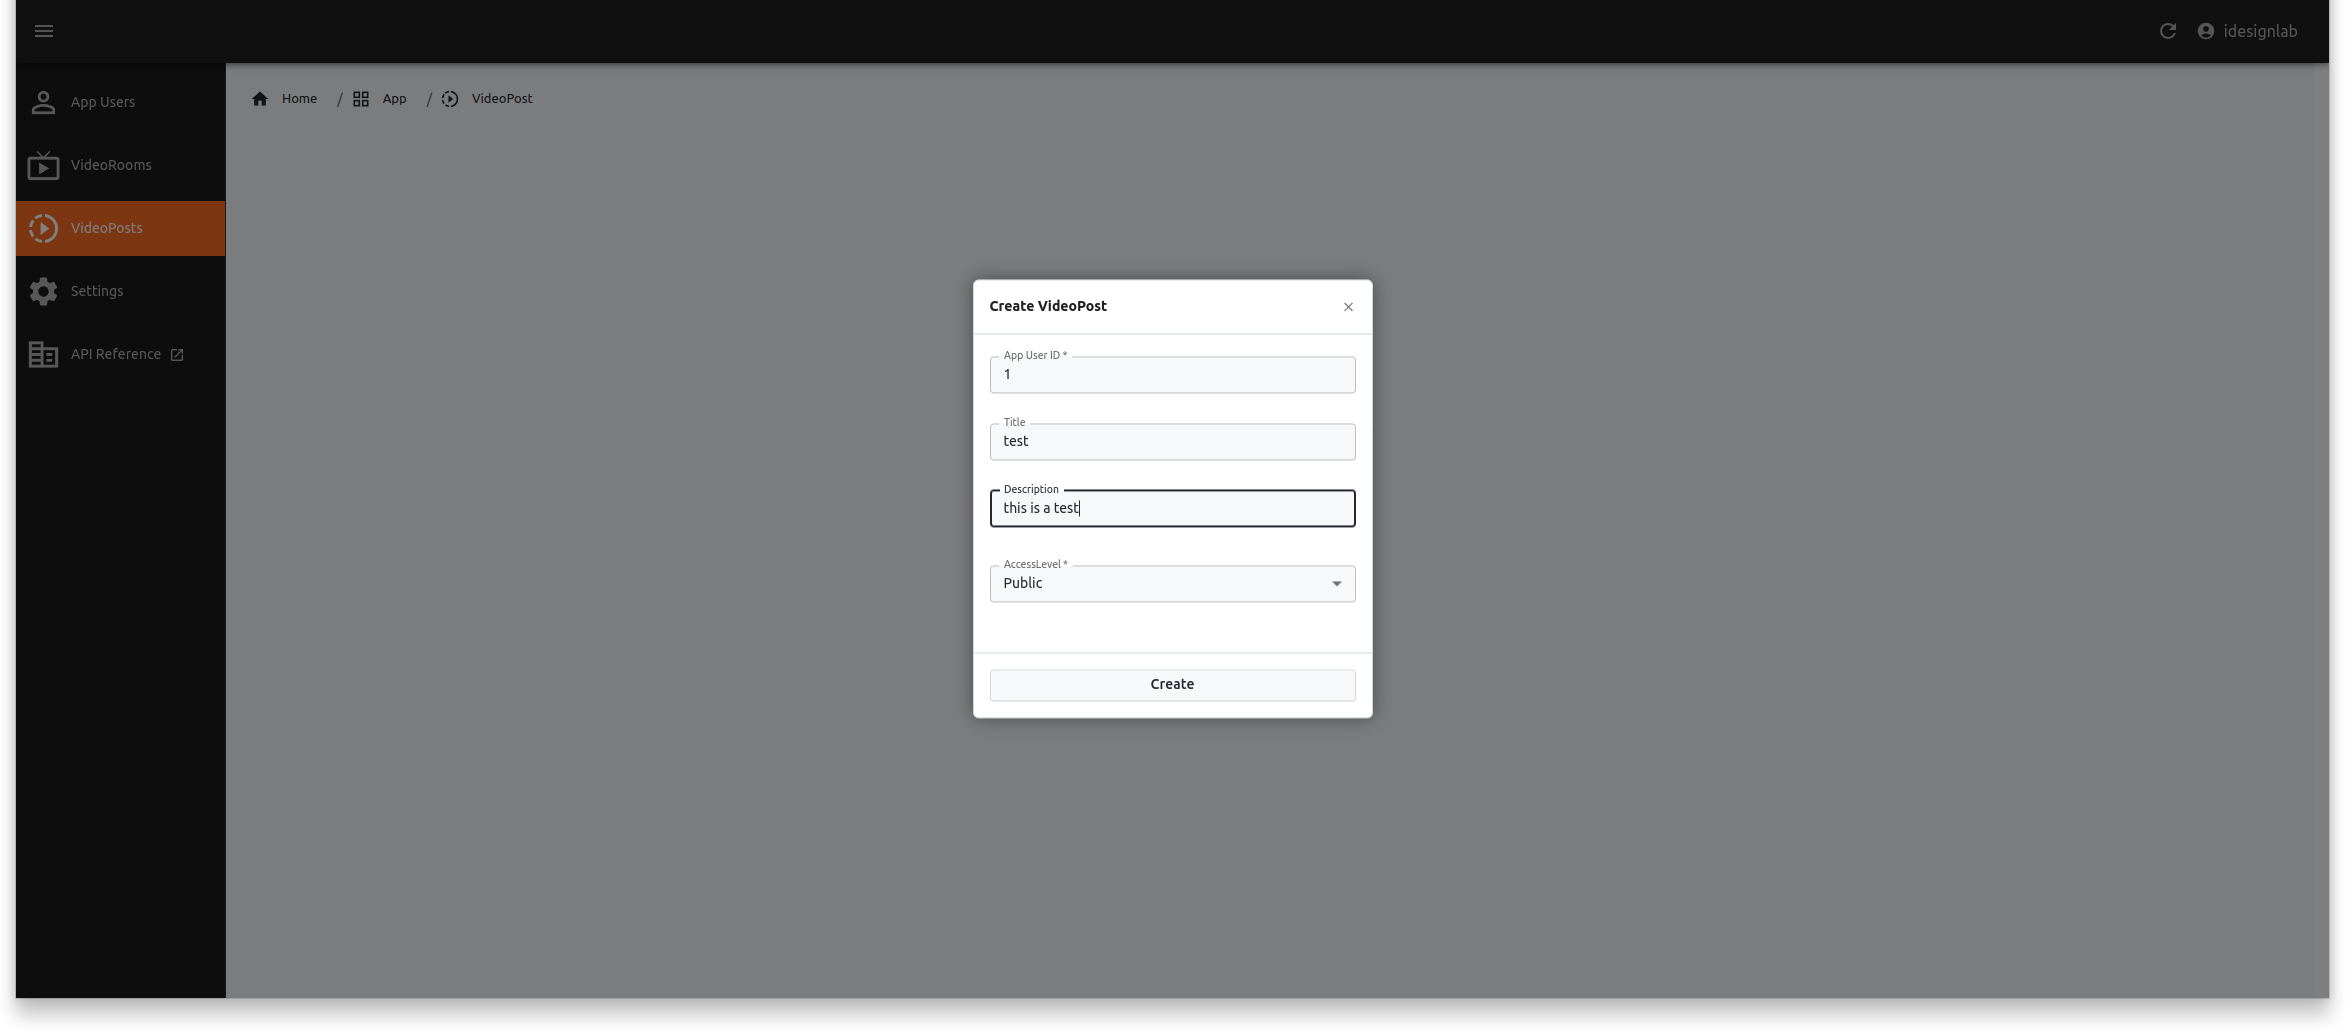
The following is the details about the input fields.
- AppUserId (Required): The
appUserIdof theMemberwho is creating theVideo Post. Once created, theVideo Postwill be associated with thisMember. - Title (Optional): The title of the
Video Post. - Description (Optional): A description of the
Video Post. - Access Level (Required): Defines the accessibility of the
Video Postfor other members and external viewers. Currently, onlyPublicis available, meaning anyone with the original or transcoded file URL can watch the video.
3. Configuring Video Post Details (e.g., transcoding specifications)
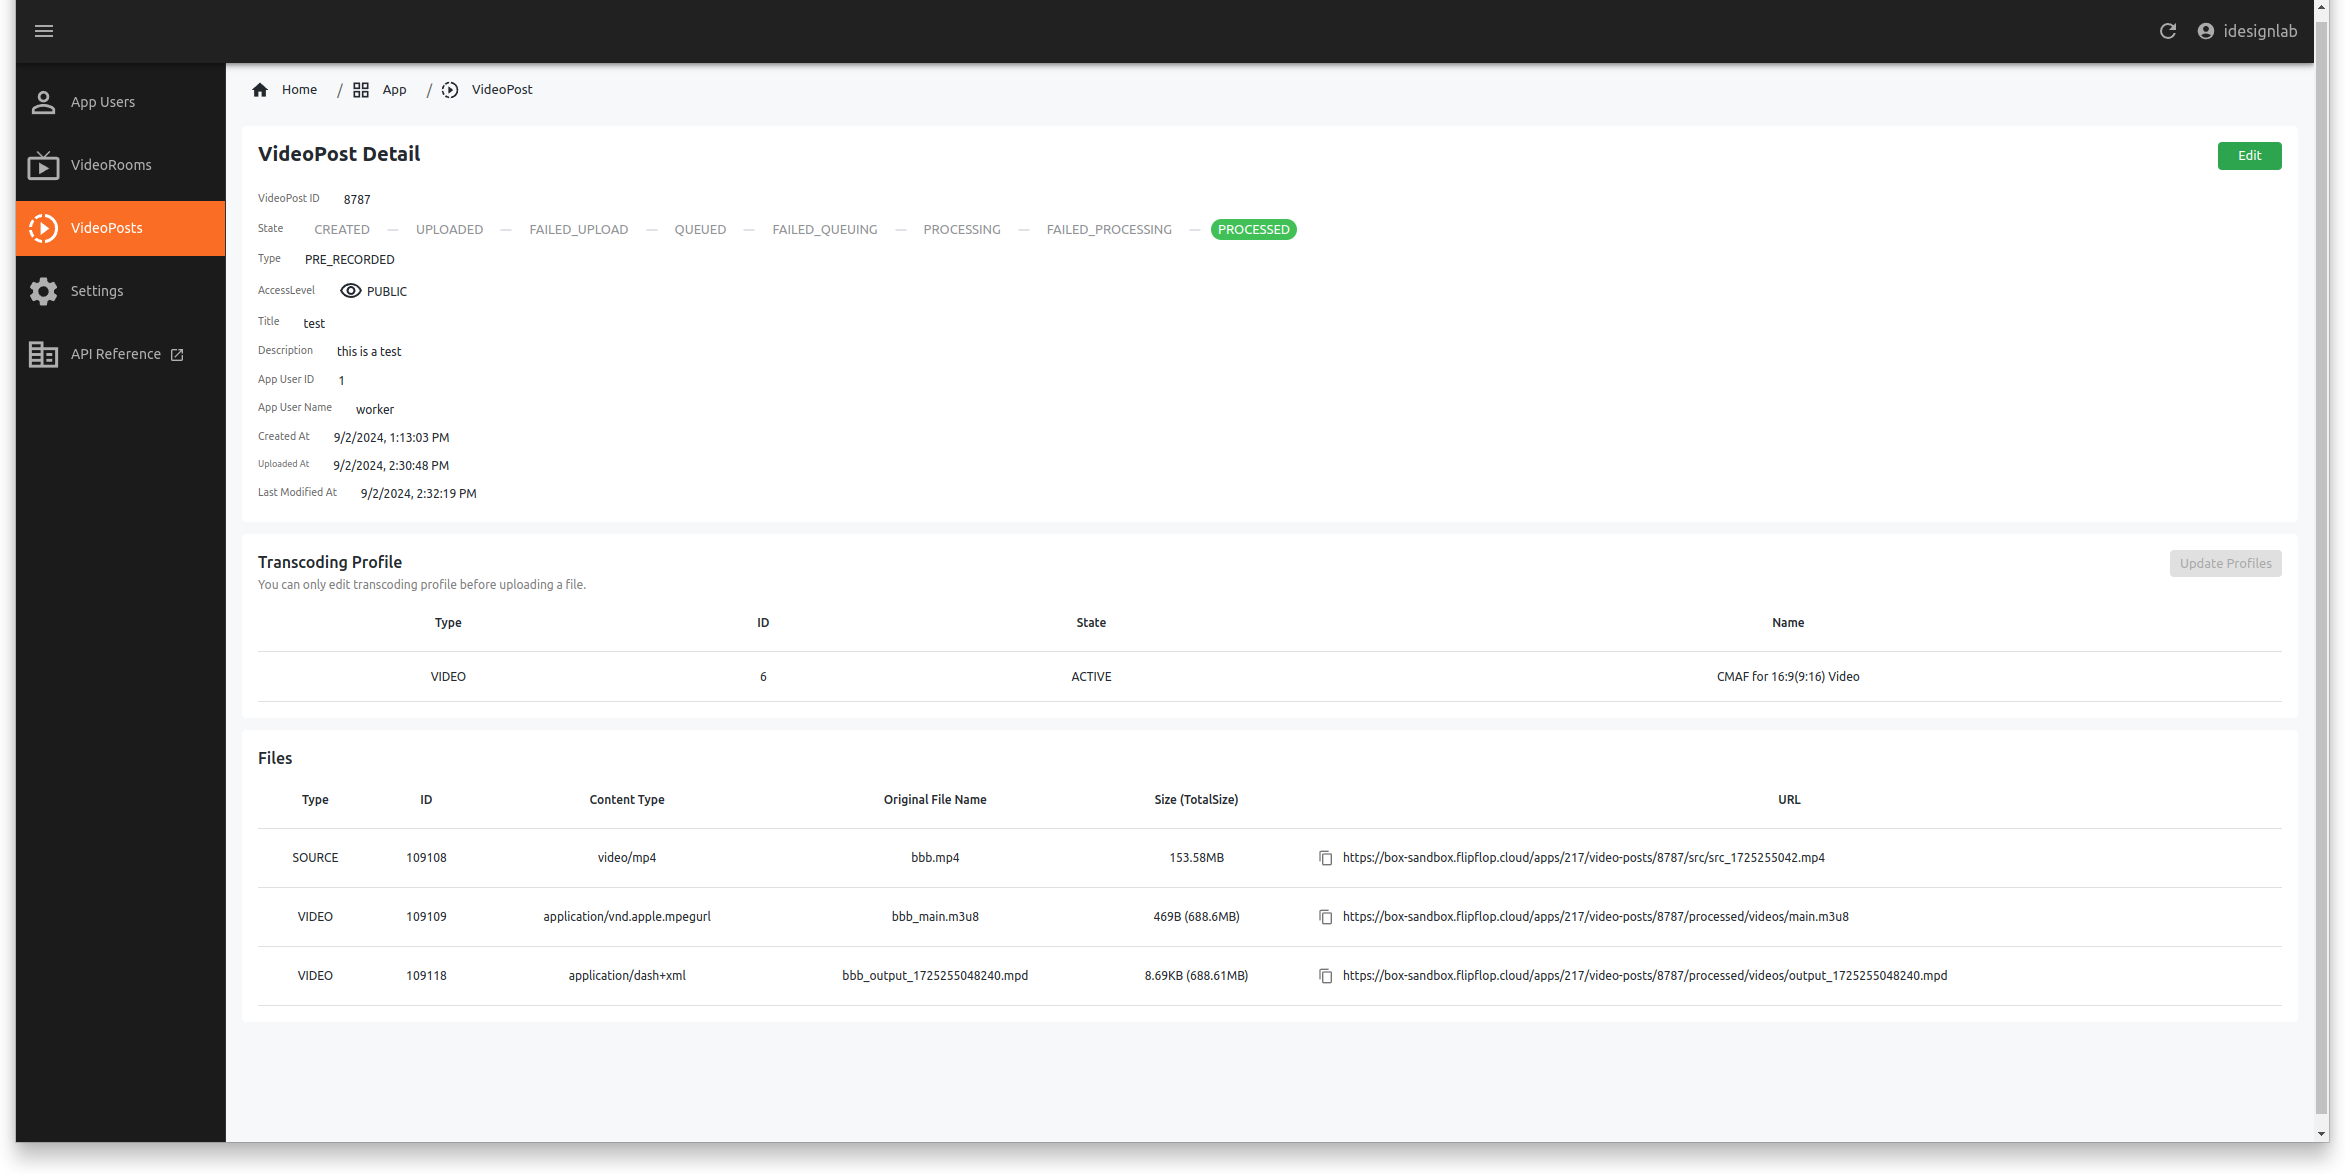
After creation of the Video Post, selecting it from the list will navigate you to a detailed information page, as shown below:
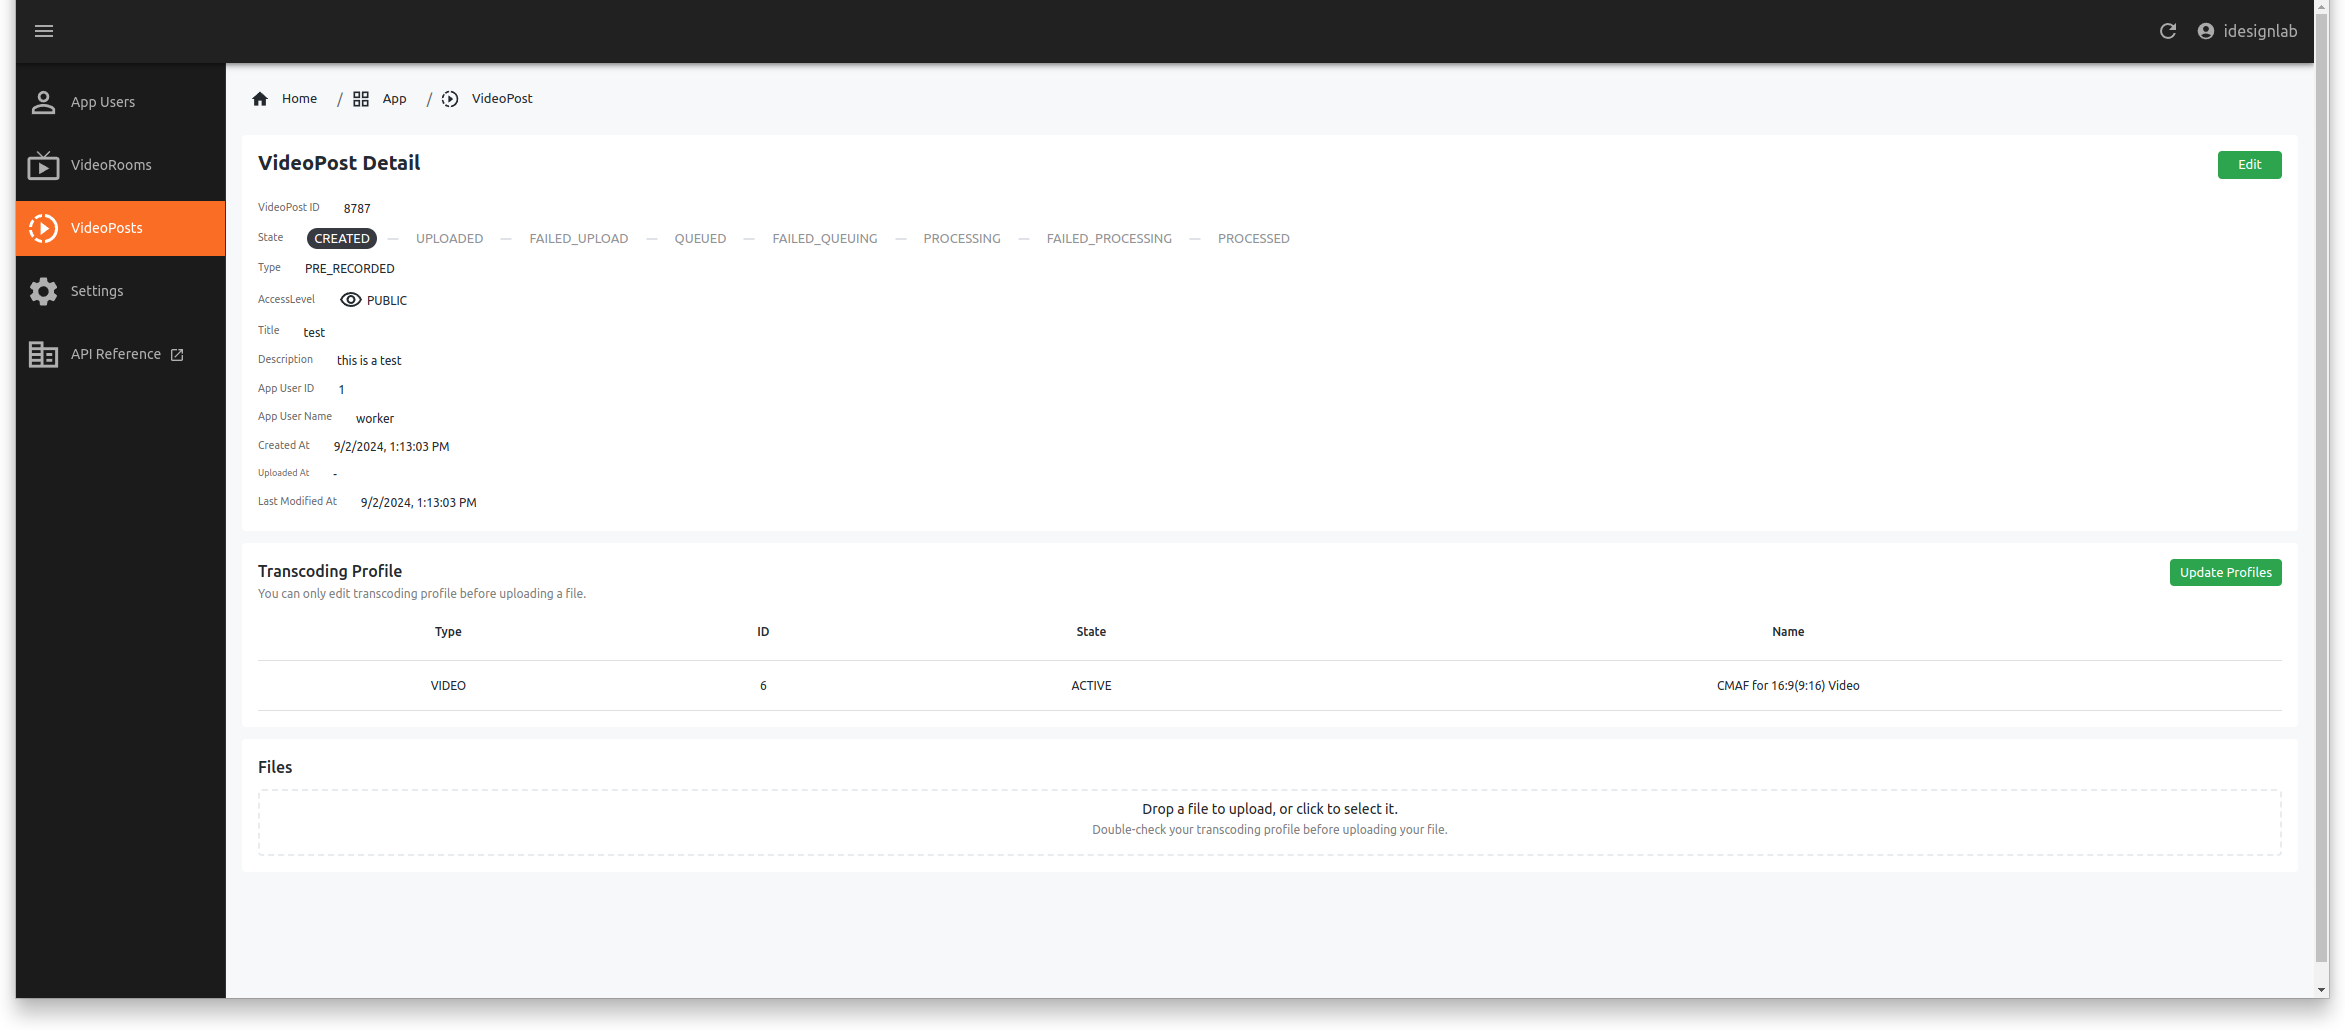
On this screen, you can configure details such as the Transcoding Profiles and upload the original video file that you want to transcode and store. Clicking the Update Profiles button will open a configuration screen where you can define Transcoding Profiles for the Video Post.
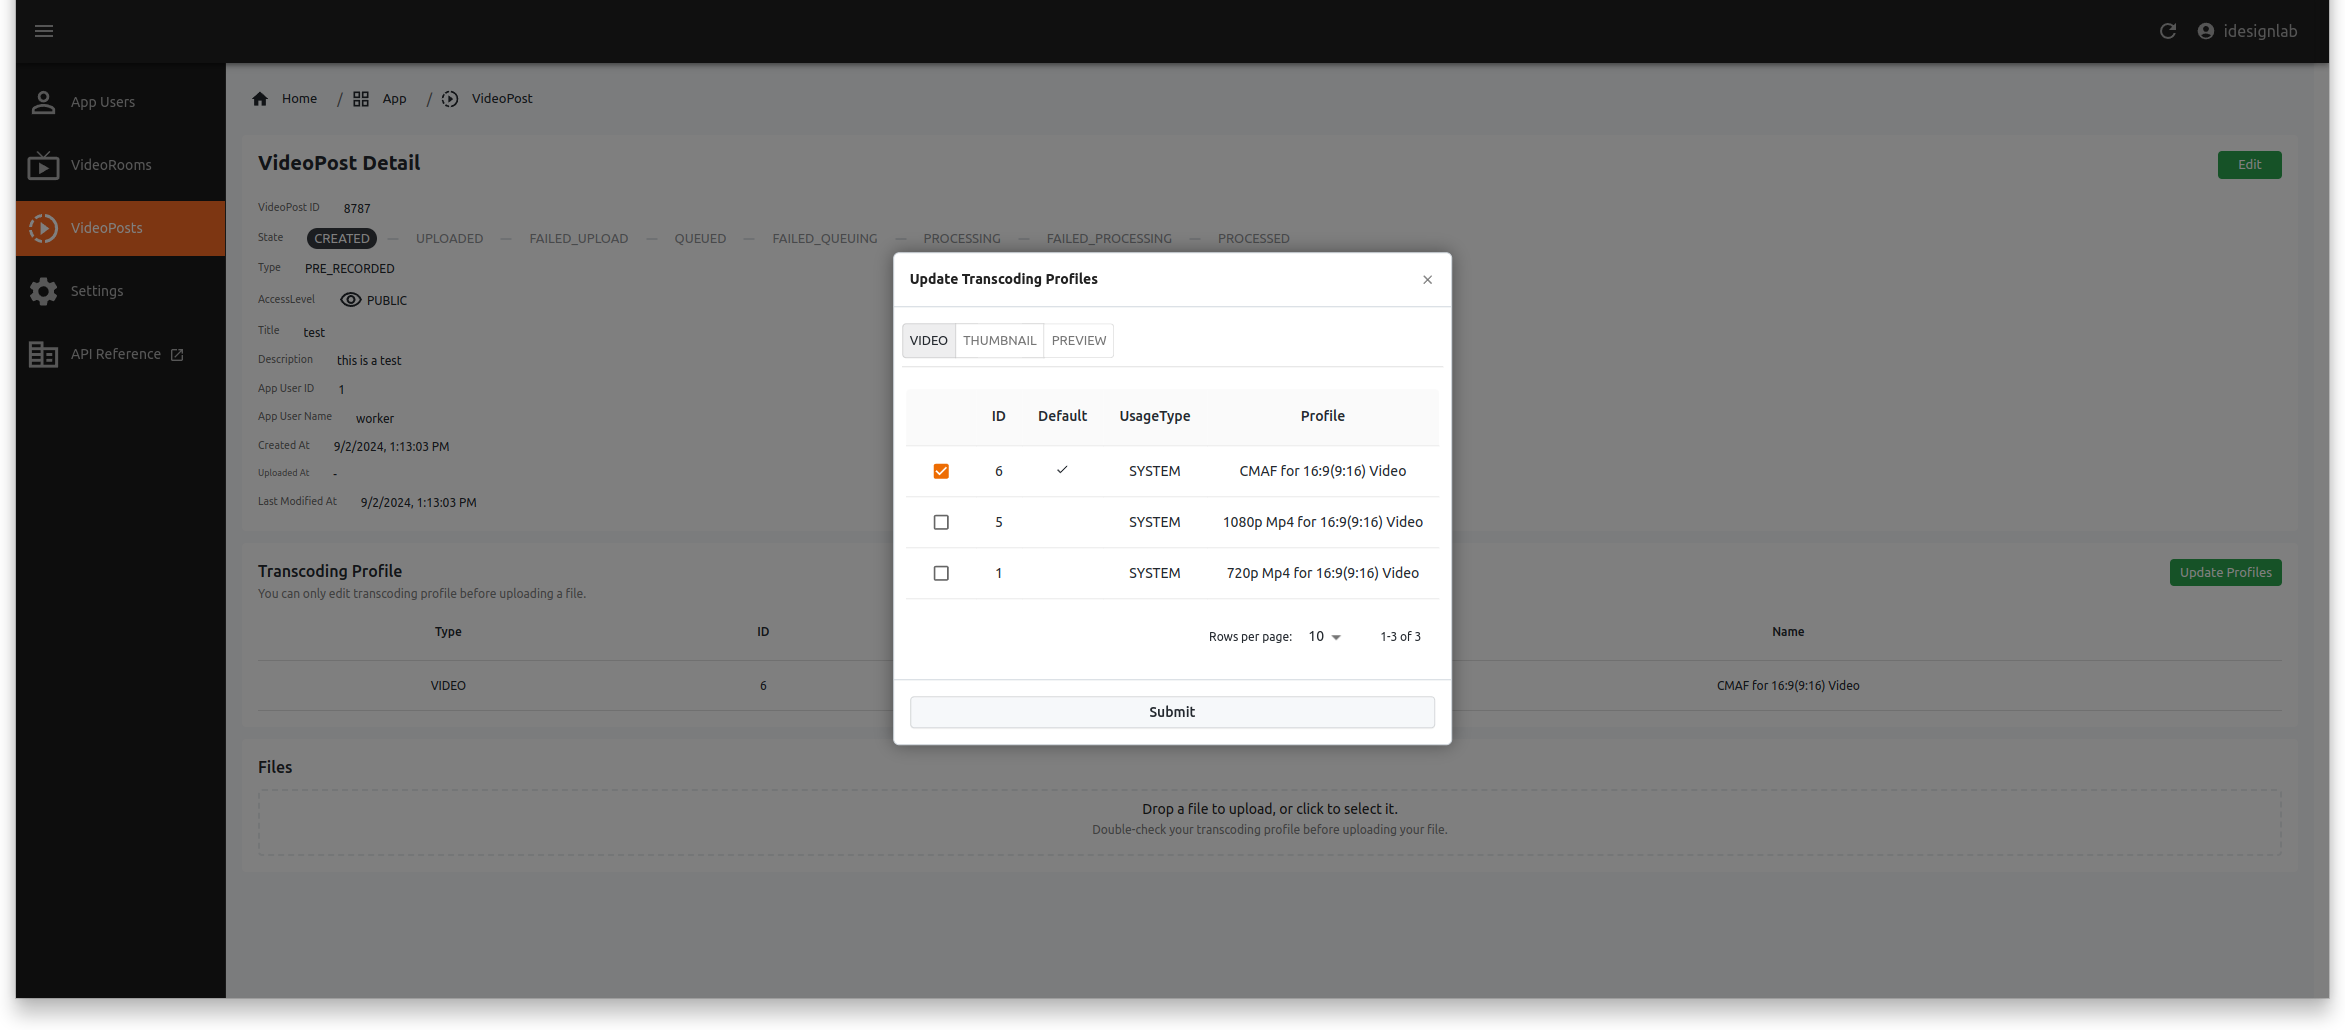
The types of Transcoding Profiles that can be set are the following.
- Video Transcoding Profile: Defines how the original video file will be transcoded.
- If not specified, FlipFlop Cloud will use the default transcoding profile.
- Thumbnail Transcoding Profile: Specifies how thumbnails will be extracted during the transcoding process.
- If not specified, no thumbnails will be generated.
- Preview Transcoding Profile: Defines how preview versions (such as animated GIFs or WEBP formats) will be extracted during transcoding.
- If not specified, no preview files will be generated.
Currently, FlipFlop Cloud offers a limited set of predefined Transcoding Profiles designed for general use. However, if you require a custom Transcoding Profile, you can request one to be created specifically for your App. These custom profiles will only be available for your App exclusively and can be tailored to meet your specific transcoding requirements.
4. Uploading the Original Video File and Monitoring Transcoding Progress/Results
There are two ways to upload the original video file for transcoding:
- Click on the "Drop a file to upload, or click to select it." area to choose a file.
- Drag and drop the file into the designated upload area.
Once the file is selected, the upload process begins automatically. When the upload is complete, the transcoding job is added to the queue. The transcoding process starts as soon as it reaches its turn in the queue.
You can track the transcoding progress in the State section:
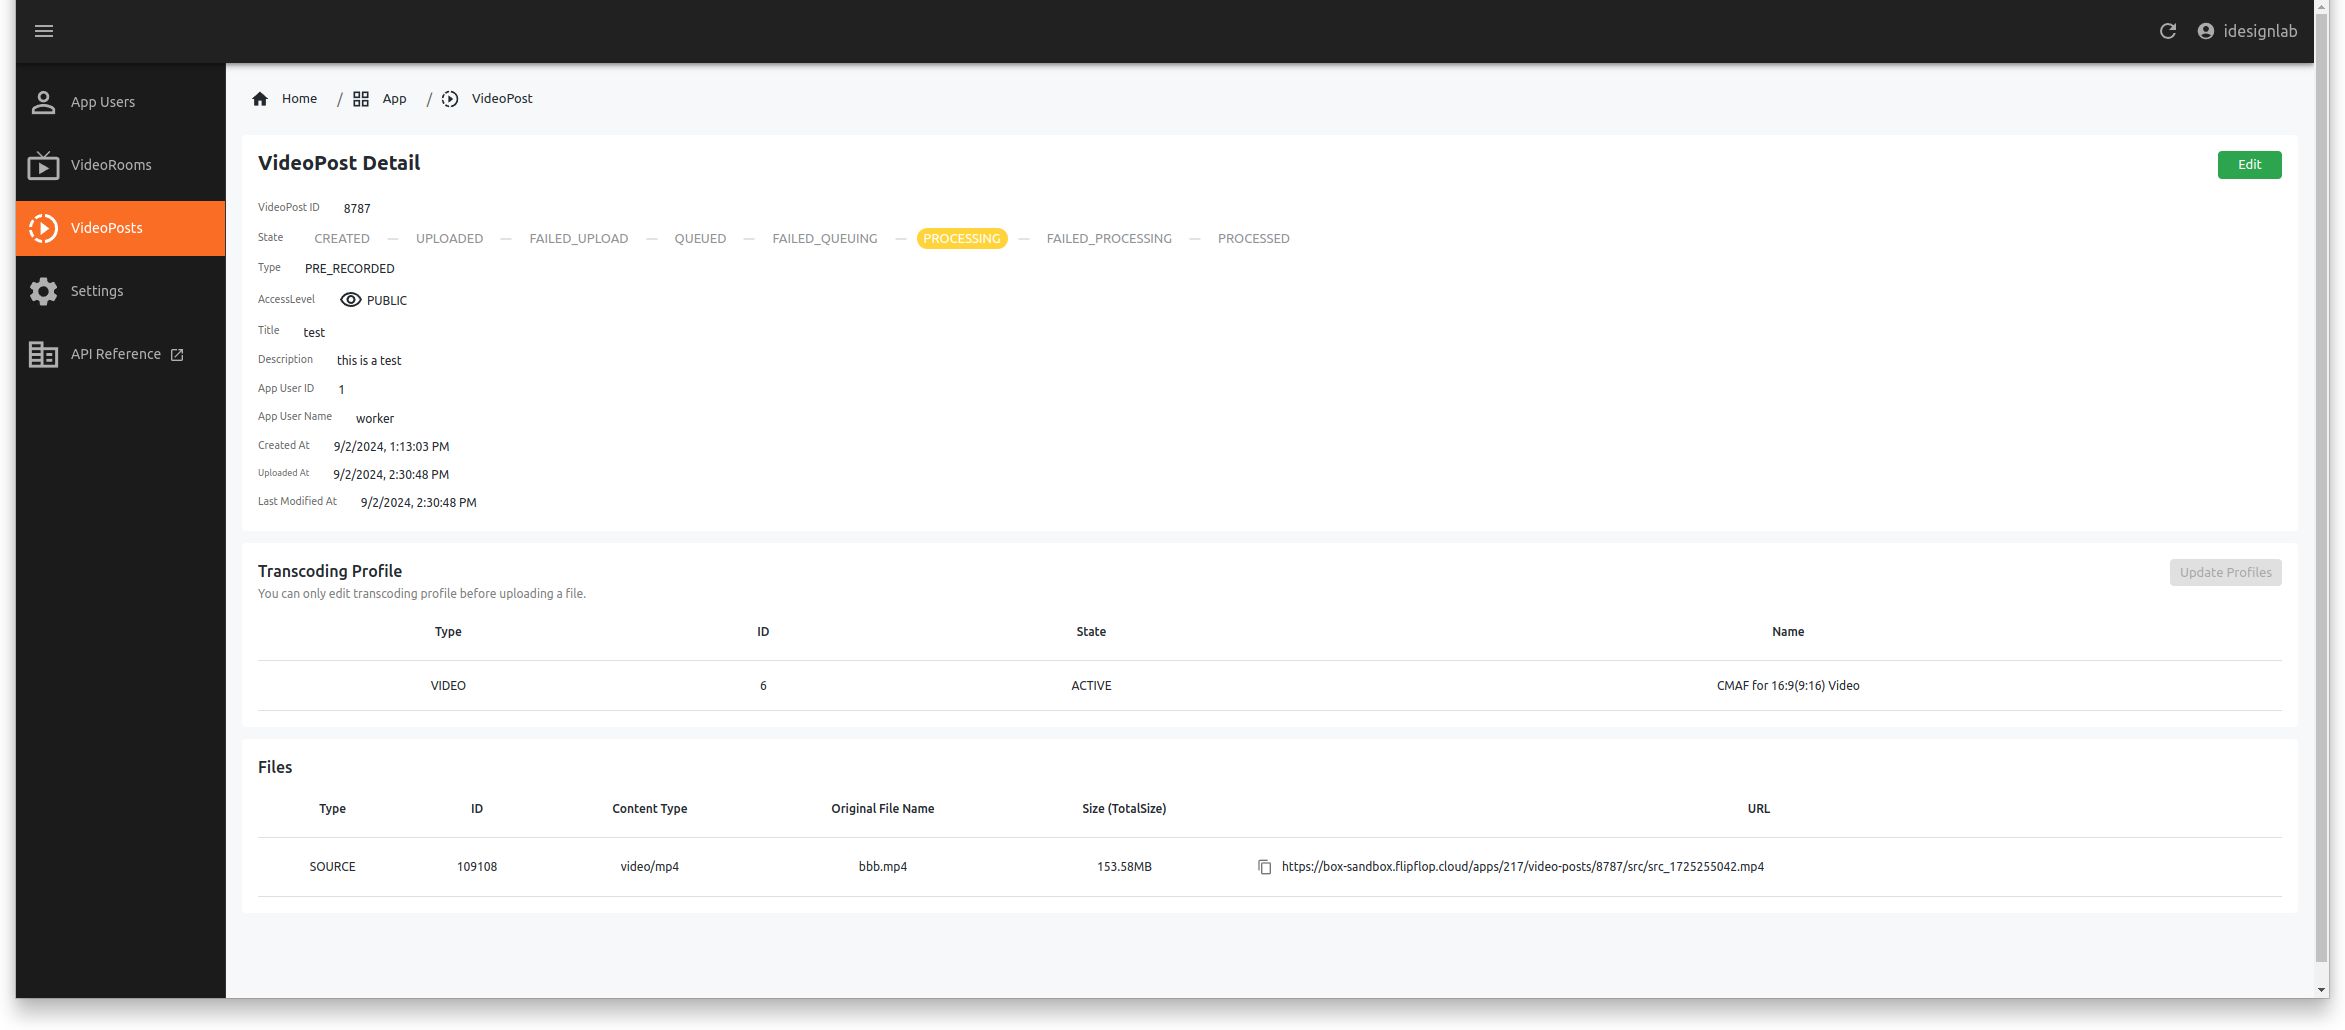
Once transcoding is complete, you can view the results in the Files section, as shown below:
Using the FlipFlop App Server API
Purpose
Using FlipFlop Cloud through the User Console differs from using it via the API, as illustrated below:
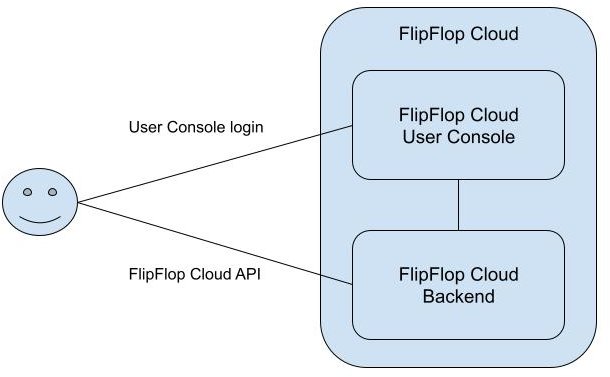
However, granting access to the User Console to your targeted users for providing video transcoding feature is not desirable.
To address this, FlipFlop Cloud provides an API, enabling seamless integration so that services can use the transcoding functionality programmatically. This allows for greater control and flexibility, as shown in the diagram below:
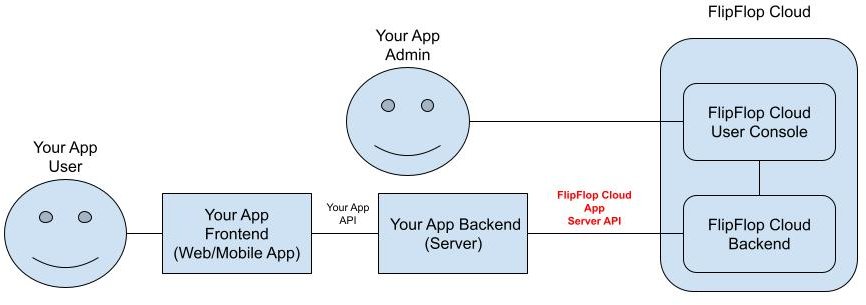
By using the API, you can programmatically manage Video Posts, initiate transcoding, and retrieve results, enabling a fully integrated experience within your application.
How to Use
The base URL for API requests is:
https://api-sandbox.flipflop.cloud
Include the Authorization header in your requests:
Basic {Base64-encoded string of API key:secret}
Server APIs should only be used in backend services. Using them directly in web/mobile apps may expose the API key/secret, leading to misuse.
API Categories and Documentation Links
Member-Related APIs
These APIs allow you to register/create members, update their information, and perform member-related operations.
-
Register and Update Member Information
(Swagger UI | API Documentation) -
Retrieve Member List
(Swagger UI | API Documentation) -
Retrieve Member Information
(Swagger UI | API Documentation) -
Delete Member
(Swagger UI | API Documentation)
Video Post API
- Create
Video Post(Swagger UI | API Document) - List
Video Posts (Swagger UI | API Document) - Get
Video Post(Swagger UI | API Document) - Update
Video Post(Swagger UI | API Document) - Delete
Video Post(Swagger UI | API Document)
Retrieving Available Transcoding Profiles via API
When creating or updating a Video Post using the API, you need to specify the appropriate Transcoding Profiles. To determine the available Transcoding Profiles, you can use the following APIs:
- List
Transcoding Profiles(Swagger UI | API Document) - Get
Transcoding Profile(Swagger UI | API Document)
Once you retrieve the available Transcoding Profiles, you can specify their IDs when creating or updating a Video Post. Assign the appropriate id values to the following fields based on the desired transcoding type.
File Upload API
When uploading files to a Video Post, there are three types of files that can be uploaded:
- Srouce File: The raw video file that will be transcoded and stored.
- Thumbnail File: If you do not want to extract a thumbnail via the
Thumbnail Transcoding Profile, you can manually upload a custom thumbnail file. - Preview File: If you do not want to extract a preview (e.g., animated GIF or WEBP) via the
Preview Transcoding Profile, you can manually upload a custom preview file.
All file uploads require the following common steps:
- Request an upload URL via an API.
- Upload the file to the provided URL using the
PUTmethod. - Notify the server that the upload is complete using another API call.
For uploading the source file, due to their typically larger size, chunked uploads (multipart uploads) are supported. When requesting an upload URL for an original video file, you can specify the number of chunks into which the file should be divided. When uploading:
- Each chunk should be uploaded separately to the provided URL using the
PUTmethod. - The API response will contain an
eTagvalue for each uploaded chunk. - Once all chunks are uploaded, an upload completion API must be called with an array of the collected
eTagvalues.
To split a file into n chunks of roughly equal size, the start and end byte ranges can be calculated as follows:
Where:
-
iis the chunk index (starting from0). -
totalFileSizeis the size of the full video file. -
nis the total number of chunks. -
Source File
- Request URL (Swagger UI | API Document)
- Complete Upload (Swagger UI | API Document)
-
Thumbnail File
- Request URL (Swagger UI | API Document)
- Complete Upload (Swagger UI | API Document)
-
Preview File
- Request URL (Swagger UI | API Document)
- Complete Upload (Swagger UI | API Document)
Registering a Webhook
You can register a webhook through the User Console by Select your App and clicking the Settings button in the left sidebar to access the app settings.
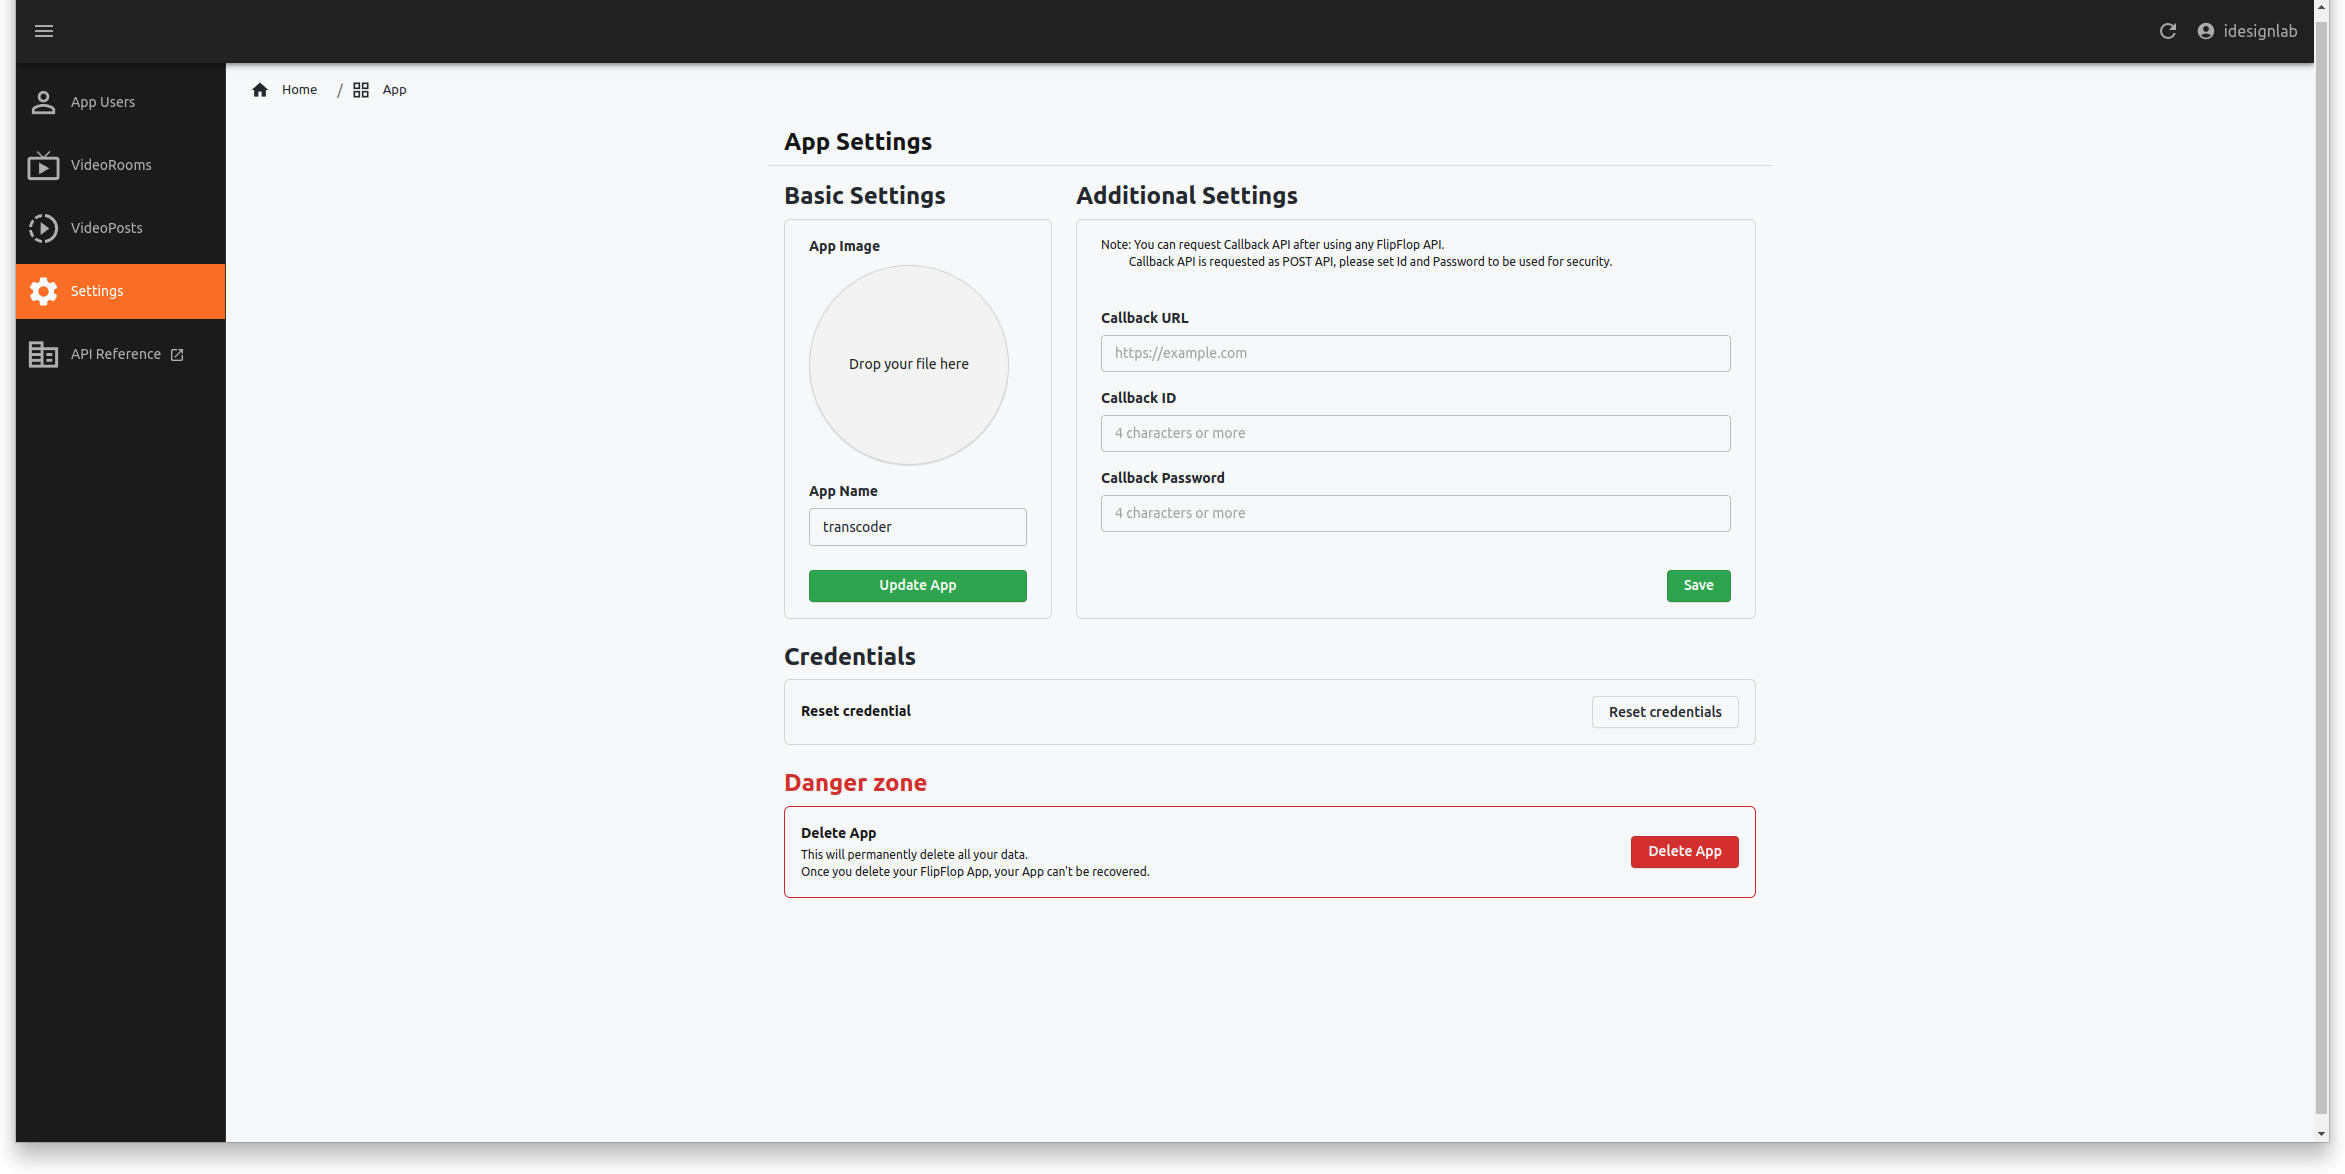
Information for Webhook Registration are as the following
- Callback URL (Required): The URL where the webhook will send event notifications.
- Callback ID (Required): Used for authentication in a basic auth scheme. If your endpoint does not require authentication, any value can be used.
- Callback Password (Required): Used for authentication in a basic auth scheme. If your endpoint does not require authentication, any value can be used.
Once the webhook is registered, FlipFlop Cloud will send a POST request with a JSON payload as the following to the specified Callback URL whenever a Video Post state changes.
{
  "videoPostId": number, // `비디오 포스트`의 id
  "videoPostVideoPostState": string // VideoPost의 state
}