Live Broadcasting with RTMP
To use FlipFlop Cloud, you must first sign up as a user. However, currently, registration is only available through inquiry due to policy restrictions. For more information on how to register and subsequent usage procedures, please refer to User Registration and Usage Procedures.
Introduction
FlipFlop Cloud provides a "Broadcast with RTMP" feature, which is suitable for conducting live broadcasts for a large audience. This feature allows broadcasters to stream using RTMP, enabling others to watch the broadcast via RTMP, HTTP-FLV(FLV over HTTP), HLS, and MPEG-DASH.
This document explains how to conduct live broadcasts using RTMP streams and describes the various settings available during the process.
Preliminary Information
FlipFlop Cloud operates separate environments for testing and commercial use, depending on the purpose. Information about each environment is as follows:
| Endpoint Type | Sandbox Environment | Production Environment |
|---|---|---|
| User Console | https://console-sandbox.flipflop.cloud | https://console.flipflop.cloud |
| API | https://portal-sandbox.flipflop.cloud | https://portal.flipflop.cloud |
| RTMP Streaming | rtmp://media-sandbox.flipflop.cloud | rtmp://media.flipflop.cloud |
| Swagger UI | https://portal-sandbox.flipflop.cloud/open-api/en/swagger-ui/ffc-app-server | https://portal.flipflop.cloud/open-api/en/swagger-ui/ffc-app-server |
| API Documentation | https://portal-sandbox.flipflop.cloud/open-api/en/docs/ffc-app-server | https://portal.flipflop.cloud/open-api/en/docs/ffc-app-server |
This document is focused on providing explanations for testing purposes, and all information is based on the sandbox environment.
Prerequisites
Creating a FlipFlop App
All functions in FlipFlop Cloud are executed within the unit of an app. The feature for live broadcasting with RTMP streams is currently only supported in the FlipFlop App. It is not yet available in the Vicollo App, but support is planned soon.
For details about app types and differences, refer to the Key Concepts > FlipFlop Cloud App Types documentation.
If you have requested the use of the live broadcast feature during the account issuance process, information about the FlipFlop App created with your account may also be provided. After logging into the User Console, you can view the list of your apps. Apps starting with vicollo_ are Vicollo Apps, while others are FlipFlop Apps. If a FlipFlop App already exists and you have its API key/secret information, you can proceed to the next step. If you have lost or do not know the API key/secret for an existing FlipFlop App, please contact support@jocoos.com. If no FlipFlop App exists, you will need to create one.
To create an app, click the Create button in the top right corner of the app list screen in the User Console. All apps created in the current User Console are FlipFlop Apps. Simply fill in the required information in the popup and click Create App.
When the app is created, a popup will display the API key/secret information. This information is required when calling the FlipFlop App server API. Since the API secret cannot be viewed again after closing the popup, it must be securely recorded and stored to prevent exposure. After recording the API key/secret information, click the Complete button to close the popup.
Preparation
To experience the live broadcasting feature, you need to know how to send RTMP streams. The following is a list of example software capable of streaming RTMP:
- Open Broadcaster Software (OBS)
- XSplit Broadcaster
- FFmpeg
- GStreamer
Even if you do not use the software mentioned above, you must know how to send RTMP streams to conduct live broadcasts.
Overview
Once you have completed the prerequisites, such as signing up as a user and creating a FlipFlop App, you can proceed with the tasks required for live broadcasting. The process is as follows:
- Create/Register Members
- Create a Video Room
- Send RTMP Stream
- Start Broadcasting in the Video Room
- Share Broadcast with Viewers
- End Broadcasting in the Video Room
The subsequent sections explain each step in detail, along with additional broadcast settings and features. The document is divided into two parts: first, explaining how to conduct live broadcasts via the User Console, and second, how to integrate the FlipFlop App server API into your service to provide live broadcasting.
Conducting Live Broadcasting with the User Console
1. Create/Register Members
All functions within a FlipFlop App are member-centric. Therefore, live broadcasting must also be conducted by members, and you need to create members in the FlipFlop App. Members can be created by selecting an app in the User Console, navigating to the App Users screen, and clicking the Create button at the top right. Fill in the required member information in the popup to create a member.
The most essential attribute for creating a member is the appUserId, which serves as a unique identifier for the member. The appUserId must be unique according to certain rules. If you want to integrate the FlipFlop App into another service to provide live broadcasting to users, it is recommended to use the unique identifier of the other service’s users as the appUserId.
2. Create a Video Room
Live broadcasts are conducted within the unit of a Video Room. Therefore, you need to create a Video Room. After selecting an app in the User Console, navigate to the VideoRooms screen to view the list of created Video Rooms. Click the Create button at the top right to open a popup where you can input the necessary details for creating a Video Room. The required attributes are as follows:
- Type (Required): Select
Broadcast RTMPfor live broadcasting. - Title (Required): The title of the
Video Roomwhere the live broadcast will take place. - Description (Optional): A description of the
Video Room. - Access Level (Required): Defines access restrictions for the
Video Room. Currently, onlyPublicis available, allowing anyone with the broadcast URL to watch. - AppUserId (Required): The
appUserIdof the member who will conduct the broadcast. Once theVideo Roomis created, it is associated with the member who created it. - ScheduledAt (Required): The scheduled start time of the live broadcast. This is only used for display purposes.
3. Send RTMP Stream
After creating a Video Room, you can start sending RTMP streams. Select the previously created Video Room from the VideoRooms screen in the User Console to view the details. The detailed screen provides information for sending RTMP streams and the broadcast status.
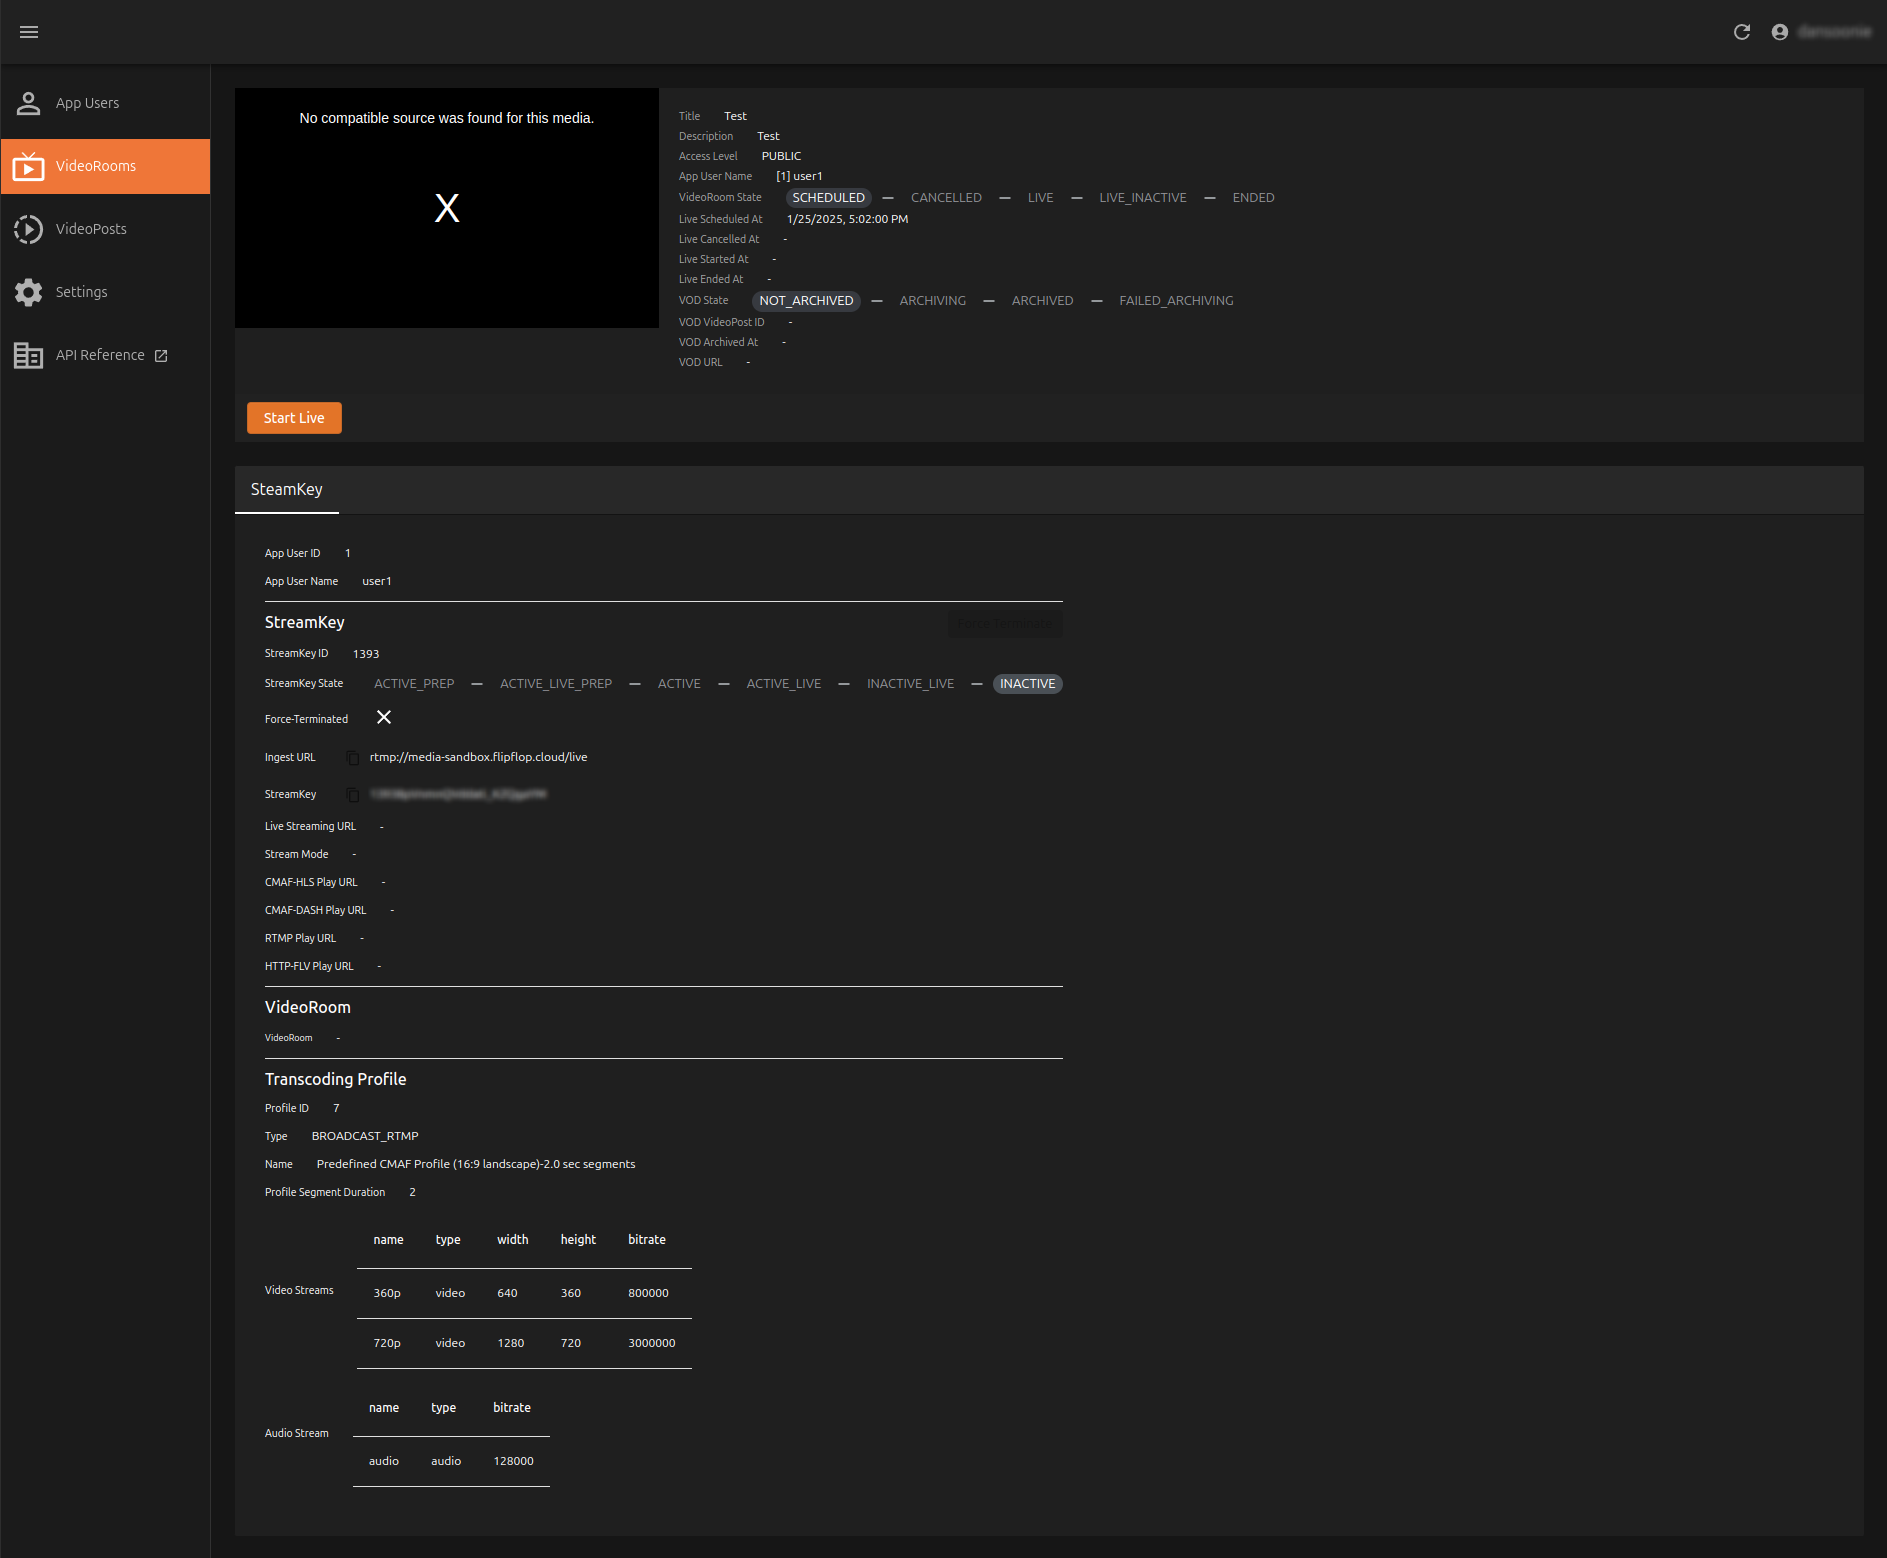
Enter the stream URL in your RTMP broadcasting software. The stream URL is a combination of the IngestURL and StreamKey, as displayed in the StreamKey section of the Video Room details. The URL format is as follows:
rtmp://media-sandbox.flipflop.cloud/live/{StreamKey}
The StreamKey is a member-specific property. The same StreamKey is used for all Video Rooms created by the same member. FlipFlop Cloud identifies the broadcaster based on this StreamKey.
Settings other than the RTMP stream URL may vary depending on the software. Refer to the software manual or contact support@jocoos.com for assistance.
On mobile devices, you can use RTMP broadcasting apps or the Android/iOS SDK provided by FlipFlop Cloud. Alternatively, you can create a custom RTMP streaming app using open-source RTMP libraries.
Streams sent via RTMP are initially only available for viewing in RTMP format. To enable viewers to watch in other formats, add a mode query parameter to the URL. The available modes are:
- RTMP: View the broadcast in RTMP format (e.g., RTMP or HTTP-FLV URLs).
- CMAF: View the broadcast in CMAF format (supports HLS and MPEG-DASH, with 360p and 720p variants).
- RTMP_CMAF: Combine both RTMP and CMAF viewing formats.
Example for enabling CMAF viewing:
rtmp://media-sandbox.flipflop.cloud/live/{StreamKey}?mode=CMAF
It is possible to configure whether the streamed output is in a horizontal or vertical format. However, this setting can only be configured using FlipFlop App Server API and cannot be configured from the user console.
When streaming via RTMP, you can track the status of the stream key in the StreamKey State section of the StreamKey area. The descriptions for each state are as follows:
INACTIVE- No streaming is being transmitted using the stream key.ACTIVE_PREP- The stream transmission has been successfully detected via the stream key.- If the streaming is interrupted in this state, it transitions to
INACTIVE.
- If the streaming is interrupted in this state, it transitions to
ACTIVE- The stream transmitted via the stream key has been successfully converted into a viewable format.- If the streaming is interrupted in this state, it transitions to
INACTIVE. - If the broadcast starts in this state, it transitions to
ACTIVE_LIVE.
- If the streaming is interrupted in this state, it transitions to
ACTIVE_LIVE- The stream transmitted via the stream key has been converted into a viewable format, and URLs for viewing through a video room are displayed.- If the streaming is interrupted in this state, it transitions to
INACTIVE_LIVE.
- If the streaming is interrupted in this state, it transitions to
INACTIVE_LIVE- The streaming via the stream key has been interrupted, causing the broadcast to stop, but the broadcast can be resumed by restarting the stream transmission.- If streaming resumes in this state, it transitions to
ACTIVE_LIVE_PREP. - If the broadcast is ended in this state, it transitions to
INACTIVE.
- If streaming resumes in this state, it transitions to
ACTIVE_LIVE_PREP- Streaming was interrupted but has been successfully detected as resumed.- If streaming is interrupted again in this state, it transitions to
INACTIVE_LIVE. - If the resumed stream is successfully converted into a viewable format, it transitions to
ACTIVE_LIVE.
- If streaming is interrupted again in this state, it transitions to
When the streamed output is successfully converted into a viewable format, the stream key's state will be ACTIVE or ACTIVE_LIVE. During these states, viewable URL information based on the converted output format will be populated in the stream key.
4. Start Broadcasting in the Video Room
When an RTMP stream is transmitted using a member's stream key and the stream key's state changes to ACTIVE, the member can start broadcasting from the video room they created. Since only one broadcast can be conducted with a single stream key at a time, members cannot run multiple broadcasts simultaneously. Therefore, if a broadcast has already started in one video room, even if the stream transmission is interrupted, the member cannot start a new broadcast in another video room unless the current broadcast is explicitly ended.
To start a broadcast, navigate to the detailed screen of the video room intended for the broadcast and click the Start Live button.
Once the broadcast begins in the video room, the stream key's state transitions to ACTIVE_LIVE. At this point, the URL information for the video room is populated with viewable URLs, allowing viewers to access the broadcast through the video room.
When a broadcast starts, the currently live video will play on the detailed screen of the video room. However, playback is currently supported only if the broadcast output mode includes the CMAF format. If the output mode is limited to the RTMP format, users must use a media player to verify the stream by playing the RTMP Play URL or HTTP-FLV Play URL provided in the StreamKey section.
As briefly mentioned in Step 3: RTMP Stream ingestion, if the stream transmission is interrupted during a broadcast, the broadcast will pause. However, if the stream is resumed while the broadcast is still active, the broadcast will automatically resume.
5. Share Broadcast with Viewers
During an ongoing broadcast, viewers can use the FlipFlop Cloud API to retrieve the video room's information and access the viewable URLs. Alternatively, broadcasters can share the Video Room URL information directly with viewers via the User Console to allow them to watch the broadcast.
Anyone with the URL can watch the broadcast because the video room's access restriction setting currently only supports the Public mode. However, features to refine and customize access permissions will be added in the future to provide more control over the audience's access.
6. End Broadcasting in the Video Room
When a broadcast is ended, it cannot be restarted, unlike when a stream transmission is interrupted during a live broadcast and can be resumed.
The proper and recommended way to end a broadcast is to stop the stream transmission and, once the stream key's state changes to INACTIVE_LIVE, click the End Live button on the video room's detailed screen.
Alternatively, there is a method to forcibly end a broadcast. This approach allows the broadcast to be terminated at any time, but it comes with the inconvenience of the member's stream key being refreshed and changed. As a result, the stream key must be retrieved again, and the settings in the streaming software need to be updated. The stream key is refreshed during forced termination to prevent unauthorized use in cases where the stream key is stolen and used to broadcast inappropriate content without the owner's intent.
Once the broadcast is ended, the stream key's state resets to INACTIVE, allowing a new broadcast to be started in another video room.
After the broadcast ends, the live stream recording from the start to the end of the broadcast is automatically converted into a VOD (Video on Demand). The VOD is created by automatically generating a Video Post. The recorded stream is uploaded as the original file and transcoded using a profile optimized for VOD playback.
Details about the Video Post created for the VOD can be found in the Video Room information section on the right-hand side of the video room's detailed screen, next to the video playback area. The video-post id value in this section provides the reference.
- If the VOD state of the
Video RoomisARCHIVING, the transcoding process is ongoing. - When the state changes to
ARCHIVED, the transcoding is complete, and the results can be viewed on theVideo Postdetailed screen.
Clicking the video-post id value will directly take you to the detailed screen of the corresponding Video Post.
Using the FlipFlop App Server API
Purpose
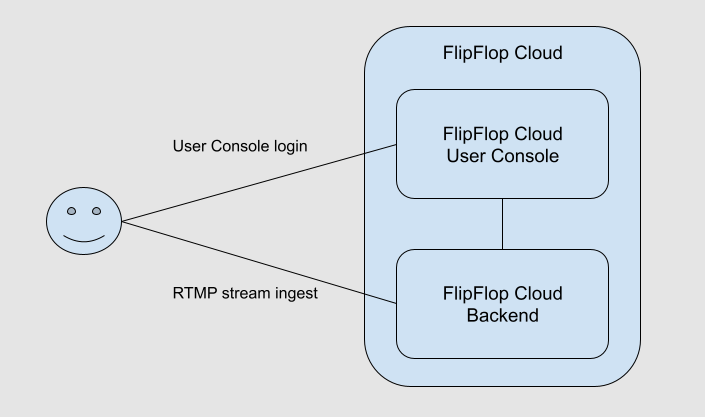
The following image shows how FlipFlop Cloud can be used via the User Console:
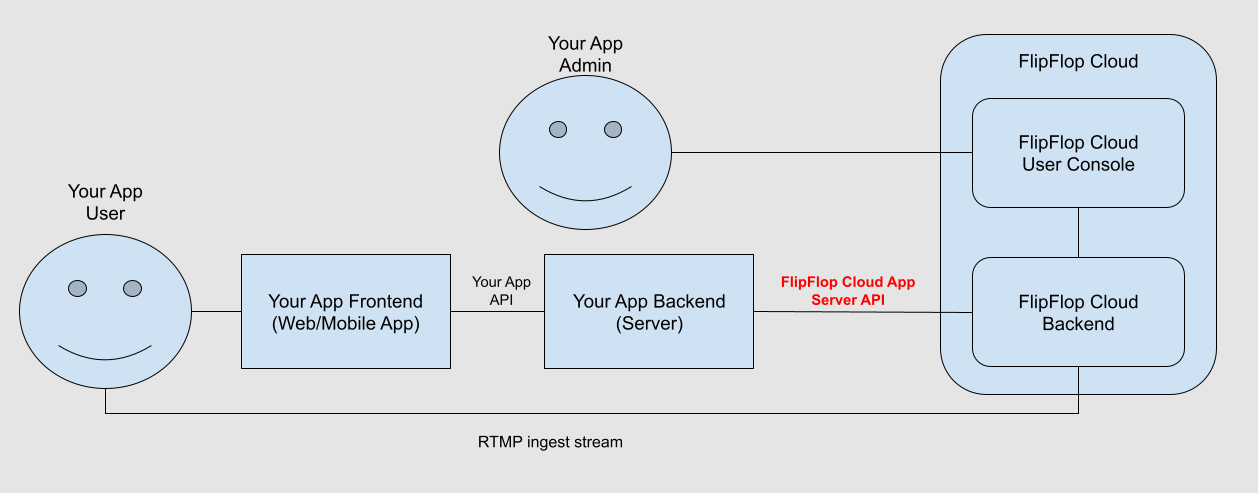
However, not everyone aiming to provide RTMP broadcasting features via the FlipFlop App can be granted access to the User Console. To address this, FlipFlop Cloud offers APIs that enable the functionality to be integrated and used as shown below:
How to Use
The base URL for API requests is:
https://api-sandbox.flipflop.cloud
Include the Authorization header in your requests:
Basic {Base64-encoded string of API key:secret}
Server APIs should only be used in backend services. Using them directly in web/mobile apps may expose the API key/secret, leading to misuse.
API Categories and Documentation Links
Member-Related APIs
These APIs allow you to register/create members, update their information, and perform member-related operations.
-
Register and Update Member Information
(Swagger UI | API Documentation) -
Retrieve Member List
(Swagger UI | API Documentation) -
Retrieve Member Information
(Swagger UI | API Documentation) -
Delete Member
(Swagger UI | API Documentation) -
Member Login
(Swagger UI | API Documentation) -
Retrieve Member StreamKey
(Swagger UI | API Documentation)
Video Room-Related APIs
These APIs allow you to create and manage Video Rooms as well as control live broadcasts.
-
Create a Video Room
(Swagger UI | API Documentation) -
Retrieve Video Room List
(Swagger UI | API Documentation) -
Retrieve Video Room Details
(Swagger UI | API Documentation) -
Update Video Room Information
(Swagger UI | API Documentation) -
Start RTMP Broadcast
(Swagger UI | API Documentation) -
End RTMP Broadcast
(Swagger UI | API Documentation)
StreamKey-Related APIs
These APIs allow you to manage StreamKeys for broadcasting members.
-
Retrieve StreamKey List
(Swagger UI | API Documentation) -
Retrieve StreamKey Details
(Swagger UI | API Documentation) -
Update StreamKey Information
(Swagger UI | API Documentation)
Transcoding Profile-Related APIs
These APIs are used to configure and retrieve transcoding profiles for StreamKeys.
-
Retrieve Transcoding Profile List
(Swagger UI | API Documentation) -
Retrieve Transcoding Profile Details
(Swagger UI | API Documentation)
Video Post-Related APIs
These APIs allow you to retrieve and manage VODs (Video Posts) created from archived live broadcasts.
-
Retrieve Video Post List
(Swagger UI | API Documentation) -
Retrieve Video Post Details
(Swagger UI | API Documentation)